I stayed seated on the hardwood floor of my new apartment. I was surrounded by a chaotic mountain of brown cardboard boxes. I had just spent the last ten hours carrying heavy furniture up three flights of stairs. My back was aching. My hands were blistered. I was completely exhausted.
I needed a massive dose of caffeine to keep unpacking.
I found the box labeled “Kitchen.” I ripped the tape off and pulled out my old, cheap plastic drip coffee maker. I plugged it into the wall. I found a half empty plastic tub of pre-ground supermarket coffee. I dumped a random amount of the stale powder into the basket, added water, and pushed the power button.
The machine hissed and sputtered. It smelled like burnt plastic and old diner food.
I poured a mug and took a sip. It was absolutely horrific. It was thin, violently bitter, and tasted like ash. I sat on the floor, surrounded by boxes, and felt completely defeated by that terrible beverage.
I decided right then and there that I deserved better. I wanted to drink cafe quality coffee in my own home. But I had just paid a massive security deposit for the new apartment. My bank account was nearly empty. I could not afford to go online and buy a thousand dollar espresso machine.
I had to be smart. I had to build a proper brewing station incrementally. Over the next twelve months, I upgraded my routine one tiny step at a time. This is exactly how I slowly improved my coffee brewing at home without going broke.
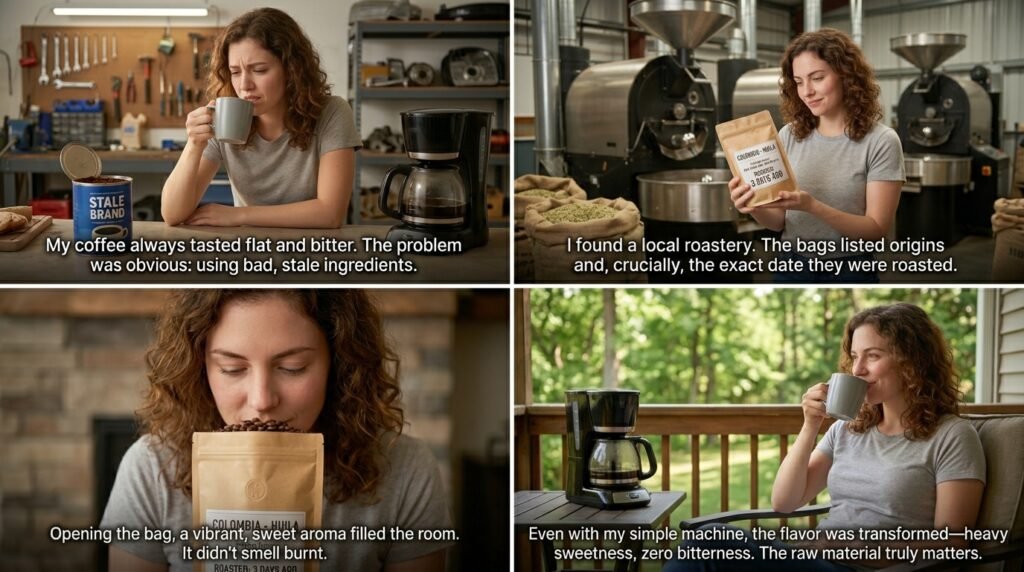
Step One: The Raw Material
The very first problem I had to fix was the most obvious one. I was using a terrible ingredient.
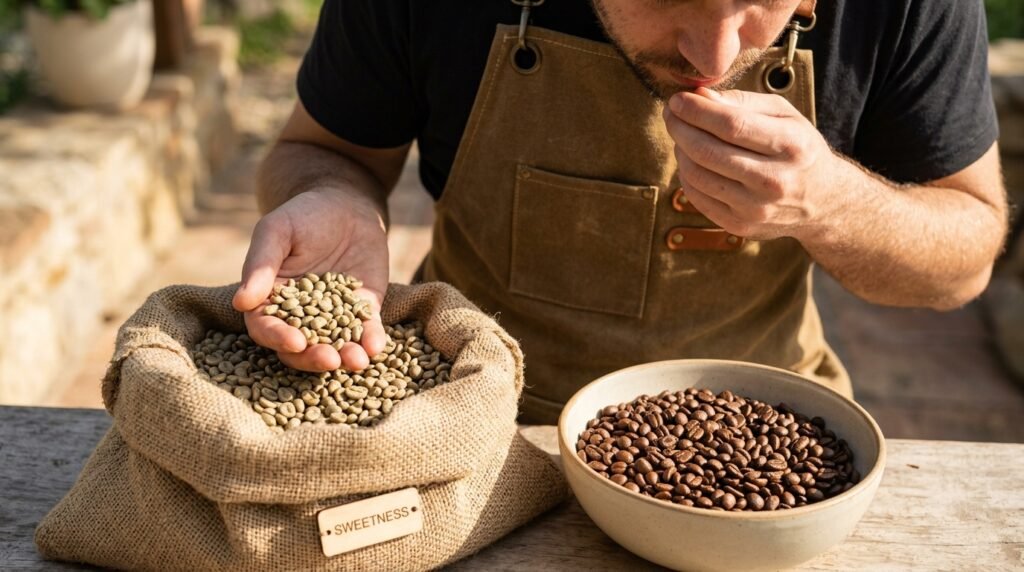
No amount of expensive equipment can fix bad coffee beans. If you start with stale, low quality agricultural products, your final beverage will always taste stale and low quality.
When I got my first paycheck after moving, I walked past the supermarket coffee aisle entirely. I drove to a small, independent coffee roastery downtown. I looked at the shelves. The bags did not just say “Dark Roast.” They listed specific countries of origin. They listed altitude levels. They listed tasting notes like milk chocolate, red cherry, and toasted almond.
Most importantly, they listed the exact date the coffee was roasted.
I bought a bag of whole beans from Colombia that had been roasted just three days prior. When I opened the bag in my kitchen, the aroma completely filled the room. It smelled vibrant and deeply sweet. It did not smell like burnt rubber.
I put those fresh beans into my terrible plastic drip machine. Even with bad equipment, the jump in flavor was astronomical. The bitterness disappeared. A heavy, sweet chocolate flavor emerged. Experiencing this massive difference was exactly What Happened When I Stopped Buying Pre-Ground Coffee and started respecting the agricultural side of the beverage. The raw material dictates the ceiling of your flavor.
Step Two: Destroying the Blade
My fresh Colombian beans tasted great, but I quickly realized I had a massive mechanical problem.
To brew the whole beans, I was using a cheap electric blade grinder. A blade grinder is basically a tiny blender. A metal blade spins at thousands of revolutions per minute and violently chops the coffee.
This violent chopping creates a chaotic mess. Some pieces of coffee are smashed into microscopic dust. Other pieces remain intact as massive boulders.
When hot water hits that uneven mixture, it creates a terrible extraction. The water over extracts the tiny dust particles, creating a harsh, dry bitterness. At the exact same time, the water under extracts the large boulders, creating a sour, weak acidity. My fresh coffee tasted sweet, but it also tasted incredibly confusing and muddy.
A few months later, I saved up enough money to buy a manual hand burr grinder.
A burr grinder does not chop. It crushes the beans between two ceramic plates. It produces a perfectly uniform, even grind. Every single particle of coffee is the exact same size.
The first time I brewed coffee with uniform grounds, the muddy flavor completely vanished. The coffee became incredibly clean and focused. Upgrading the grinder was the single biggest leap in quality I experienced during the entire year.
Step Three: The End of Guesswork
I was now using fresh beans and grinding them perfectly. But my results were still wildly inconsistent from day to day.
Some mornings my coffee tasted heavy and rich. Other mornings it tasted watery and thin. I could not figure out why.
I looked at how I was measuring my ingredients. I was using a plastic tablespoon to measure my coffee beans. I was using the painted lines on the side of a glass pot to measure my water.
Volume is a terrible way to measure coffee. Light roast beans are small and dense. Dark roast beans are large and airy. One scoop of a light roast contains significantly more actual coffee mass than one scoop of a dark roast.
I went online and spent fifteen dollars on a digital kitchen scale.
I stopped using spoons. I started weighing my coffee in exact grams. I started weighing my water in exact grams. I locked in a strict ratio of one gram of coffee to sixteen grams of water.
The inconsistency vanished overnight. I was no longer gambling with my morning cup. Taking this deliberate, mathematical approach was the core foundation of How I Built My Simple Coffee Setup at Home piece by piece. A digital scale gives you absolute, undeniable control over your recipe.
Step Four: Taming the Heat
With my measurements locked in, I started paying attention to the actual brewing chemistry.
I was still using my old automatic drip machine. It was starting to fail. The internal heating element was incredibly aggressive. It was boiling the water and spitting it violently over the coffee grounds.
Extreme heat destroys coffee. When violently boiling water hits delicate, fresh coffee grounds, it instantly scorches the natural fruit acids. It burns the complex sugars. It leaves behind a harsh, ashy flavor that coats the back of your throat.
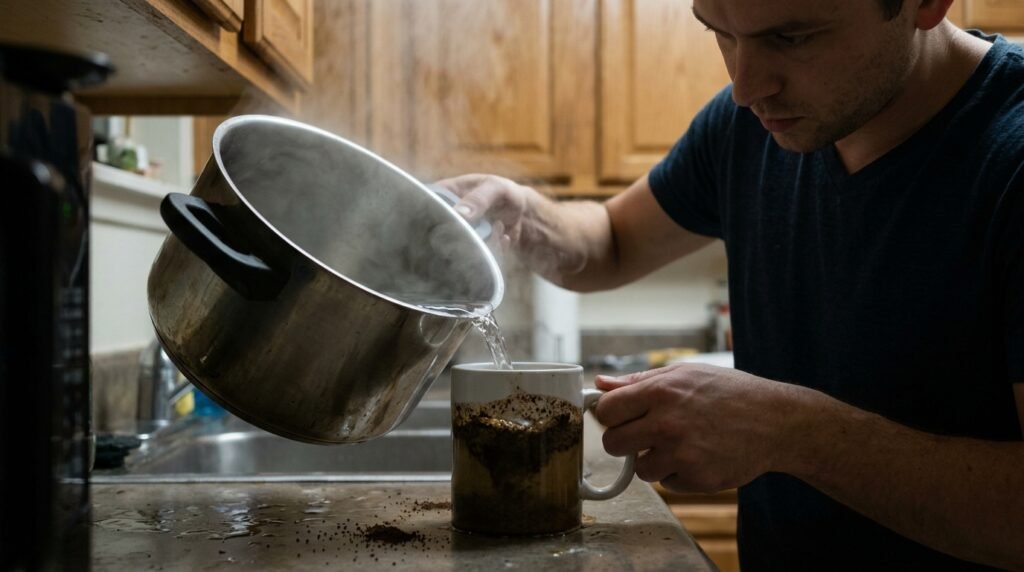
I decided to stop using the machine. I started boiling water in a standard cooking pot on my stove.
But I changed my approach to the heat. When the water reached a rolling boil, I turned the stove off. I set a timer for exactly sixty seconds. I forced myself to wait.
Letting the water sit for one minute allowed the extreme thermal energy to dissipate. The water dropped to a perfect two hundred degrees. When I poured this slightly cooler water over my coffee, the burnt flavor disappeared entirely. The delicate, sweet notes finally had a chance to survive the extraction process.
Step Five: The Plastic Cone
Boiling water in a cooking pot was an effective workaround, but it was incredibly messy. I needed a dedicated brewing device.
I still could not afford a massive, expensive machine. I went to a local specialty cafe and looked at their retail shelf. I found a simple, cone shaped piece of plastic. It was a manual pour over dripper. It cost ten dollars. I bought it, along with a box of paper filters.
Switching to a manual pour over method completely changed my relationship with coffee.
I was no longer pushing a button and walking away. I had to stand in my kitchen. I had to pour the water myself. I had to actively manage the extraction.
The physical results were staggering. The paper filter trapped all the heavy, bitter oils and microscopic dust. The liquid that dripped into my mug was a brilliant, translucent ruby color.
The clarity of the flavor was absolutely brilliant. It felt like drinking a complex fruit tea rather than a heavy, muddy cup of coffee. The plastic dripper completely elevated my morning. It was cheap, indestructible, and it quickly became The Coffee Tool I Now Use Every Morning without exception.
Step Six: Controlling the Flow
The plastic pour over cone was incredible, but it exposed a final flaw in my setup.
I was still pouring water out of a wide mouth cooking pot. When I tilted the heavy pot, a massive wave of water would crash into the fragile coffee bed. The heavy splash would dig deep craters into the grounds. The water would rush through those craters, causing a severely uneven extraction.
I needed physical control. I needed precision.
I bought a stainless steel gooseneck kettle. A gooseneck kettle features a long, thin, curved spout. It restricts the flow of water to a delicate, highly controlled stream.
The first time I used the gooseneck kettle, the brewing process felt like a surgical operation. I could pour the hot water in perfectly tight, slow concentric circles. I could gently saturate every single grain of coffee without disturbing the flat surface of the bed.
I was finally able to dictate the exact speed of the extraction. The gooseneck kettle was the final piece of the puzzle. It gave me total mastery over the flow of water.
Reviewing the Final Setup
A full year after moving into that apartment, I stood in my kitchen and looked at my counter.
I did not have a massive, stainless steel espresso machine taking up half my workspace. I did not have a complicated appliance with digital screens and blinking lights.
My setup was incredibly minimal. I had a bag of fresh, locally roasted beans. I had a manual hand grinder. I had a digital scale. I had a cheap plastic cone. I had a gooseneck kettle.
The total cost of my entire coffee station was less than a hundred dollars.
But the coffee I was producing every single morning rivaled the best specialty cafes in my city. It was perfectly extracted. It was vibrantly sweet. It was incredibly consistent. I had built a luxury culinary experience on a very tight budget.
The Value of the Slow Burn
When we decide we want to improve a hobby, our immediate instinct is to spend a lot of money.
We think buying the most expensive gear will automatically make us an expert. We try to skip the learning process entirely by throwing our credit cards at the problem.
That is a massive mistake.
If I had purchased a thousand dollar espresso machine on the day I moved into my apartment, I would have hated it. I did not know how to dial in a grinder. I did not understand brew ratios. I did not understand thermal management. I would have made terrible, expensive coffee and felt completely frustrated.
Improving my coffee setup slowly forced me to actually learn the underlying science.
Isolating the Upgrades
Because I upgraded one piece of equipment at a time, I could clearly taste the exact impact of that specific tool.
When I bought fresh beans, I learned how raw agriculture impacts sweetness. When I bought the burr grinder, I learned how uniformity prevents bitterness. When I bought the digital scale, I learned how mathematics guarantees consistency. When I bought the gooseneck kettle, I learned how kinetic flow dictates extraction speed.
Each purchase taught me a distinct, vital lesson about the brewing process.
I built a foundation of knowledge. I did not buy my way into good coffee. I learned my way into good coffee. The slow, methodical approach turned me from a passive consumer into an active craftsman.
Advice for the Beginner
If you are currently drinking bad coffee at home and you want to improve, I highly encourage you to pace yourself.
Do not go online and buy an entirely new setup today. Do not overwhelm yourself with a dozen new variables.
Start with the absolute easiest step. Find a local coffee roaster in your city. Buy a bag of whole beans that were roasted this week. Smell the difference. Taste the difference. Let your palate adjust to the lack of stale bitterness.
Wait a month. Then, buy a cheap manual hand grinder. Experience the physical effort of crushing the beans yourself. Notice the cleaner flavor profile.
Wait another month. Buy a digital scale. Start weighing your ingredients. Notice the sudden reliability of your morning routine.
Take your time. Let each small upgrade settle into your daily habit before you introduce the next one. The journey of improving your home coffee is incredibly rewarding. By taking it one step at a time, you will build a deep, genuine appreciation for the craft, and your morning mug will taste significantly better because you actually earned it.